A couple of weeks ago, I migrated my personal website from WordPress to Hugo, which saved me $15/month on Flywheel hosting. Before the migration, I was also using Hover’s custom domain email service at one point — which allows you to send and receive email from an address like wen@threeportkeys.com. That costs $30/year for 10GB on Hover.
Since lately I’ve had great success having Claude Code help me find developer-friendly free options — Hugo, Cloudflare, etc. — I wondered if there’s also a free and clean option for custom domain email. And there is!
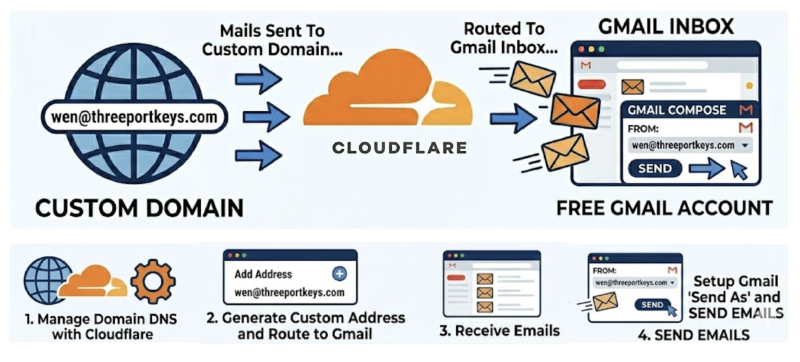
It turns out Cloudflare, which is already the central service managing my domains, also offers free email routing. Meaning you can create a custom email address on your domain (e.g., wen@threeportkeys.com) and have it forward to your Gmail — at no cost.
Here’s the step-by-step guide.
📨 Part 1: Receiving Email (Cloudflare Email Routing) #
This part is super easy.
🔘 Step 1: Add a Custom Address in Cloudflare #
In your Cloudflare dashboard, go to your domain → Email → Email Routing. Add a custom email address (e.g., hello@yourdomain.com) and set your Gmail address as the destination. That’s it — Cloudflare now knows where to forward your mail.
🔘 Step 2: Update Your DNS Records #
Cloudflare will show you what needs to change in your DNS:
- Delete any conflicting MX records (e.g., leftover records from a previous registrar like Hover).
- Cloudflare will automatically suggest the required MX records, TXT records for DKIM and SPF. It’s totally fine if you don’t understand what those are for — you don’t need to do anything manually.
- There’s an “Add records automatically” button — just click it and everything will be set up for you.
🔘 Step 3: Verify Email Routing Address #
Wait a few minutes — you’ll receive an email from Cloudflare asking you to verify your email routing address. Click on “Verify email address” and you’re done with the Cloudflare side of things!
At this point, any emails sent to your custom domain address will arrive in your Gmail inbox.
📤 Part 2: Sending Email From Your Custom Address in Gmail #
This is where it gets a little more involved, but don’t worry — if you follow along, you should be able to get it configured within 10 minutes. Since Cloudflare only routes incoming mail, you need Gmail’s built-in SMTP feature to send as your custom address.
🔘 Step 1: Enable 2-Step Verification on Google #
Google requires 2-Step Verification before you can generate an App Password. And Google no longer allows regular passwords for SMTP access — so this step isn’t optional.
- Go to Google Account Security.
- Find 2-Step Verification and turn it on.
- Follow the prompts to verify with your phone.
If you already have it enabled, skip ahead.
🔘 Step 2: Generate an App Password #
This is the step where people get stuck — not because it’s hard, but because the App Passwords option doesn’t show up as an obvious link in Google’s settings UI.
The easiest way is to go directly to: 👉 myaccount.google.com/apppasswords
- Enter a name (e.g., “Gmail Send As”) and click Create.
- Copy the 16-character password. You’ll only see it once, so don’t close that window too fast.
🔘 Step 3: Add Your Custom Address in Gmail #
- Open Gmail → Settings (gear icon) → See all settings → Accounts and Import tab.
- Under “Send mail as”, click “Add another email address.”
- Enter your name and custom email address.
- On the next screen, enter:
- SMTP Server:
smtp.gmail.com - Port:
587 - Username: your full Gmail address
- Password: the App Password you just generated (not your regular Google password!)
- Connection: select Secured connection using TLS
- SMTP Server:
- Click Add Account.
🔘 Step 4: Verify #
Gmail will send a verification email to your custom address. Since Cloudflare is already forwarding everything to your Gmail, it should arrive in your inbox within seconds. Click the confirmation link or enter the code, and you’re done.
🎉 That’s It — Custom Domain Email for Free~ #
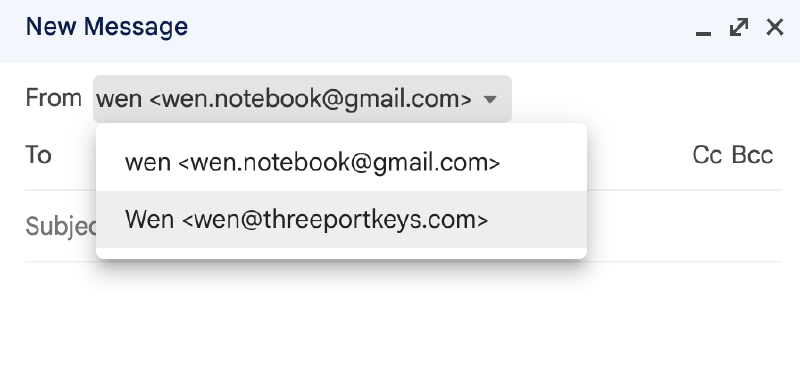
When composing a new email in Gmail, you’ll now see a “From” dropdown that lets you pick between your Gmail address and your custom domain address, like this:
The point here isn’t really that $30/year is a lot of money — it’s that this is a one-time setup you do once and never worry about again. No recurring service to manage, no extra dependency on yet another provider.
For developers especially, this kind of work is a great way to start learning how different services connect. And with the help of AI coding agents these days, it’s very easy to figuring out these configurations.